Posts in DIY
DIY Umbrella on the Cricut Design Space Star™

Disclosure: I am a member of the Cricut Blogger Network. I may receive prizes in exchange for my winning projects. Even though I am not being directly compensated for these posts, I am under consideration for a prize with Cricut Design Space Star. All opinions are 100% my own.

PC_DIYumbrella_pin.jpg

I've wanted to turn my Pars Caeli cloud into an umbrella design for the longest time, with no tools to make it happen. And then this wild and wonderful Cricut Design Space Star contest comes blowing into my life, and I know exactly what I want my first project to be!

This cloudy umbrella is basically a no-mistake project. Vinyl shapes can be moved and removed without leaving marks or residue. The shapes cling easily to the coated material, and the transparency of the umbrella allows you to see what you're doing the whole way through. I had my first bubble umbrella when I was six, and I've loved them ever since. These clear canvases also pair beautifully with the opaque vinyl.

So now that we've all left our intimidation at the door, here's what you need to make your own:

  • Clear umbrella (this one is from Totes in a classic design)
  • White vinyl sheets
  • Cricut Explore
  • Gold paper or vinyl
  • Cloud and lining template

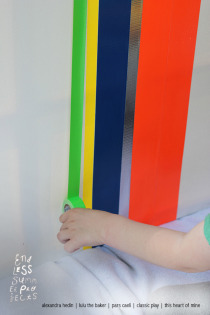
Step One: Design your pattern. Of course, I wanted clouds. Using Illustrator I created an .svg file. Based on the size of my umbrella, I made the clouds about three inches wide. I was happily surprised with how many clouds I could fit on one sheet. Using the vinyl setting, feed your mat with vinyl into the machine and carefully remove the cut clouds from your mat when complete.

PC_diyumbrella_cricut.jpg

I created another .svg file with the thin lining that rests on the bottom of the clouds. I changed the setting to paper, and fed in gold hammered scrapbook paper. These were fragile so removing them from the mats was a careful process.

Step Two: Next I wanted a GOLD lining for the clouds. I'm joining with a merry group of ten creatives for this Cricut Design Space Star challenge, and we had decided early on that we wanted our theme to be Gold is the New Black. And, do you know what's even better than finding the silver lining on a cloud? Yes, that's right, finding a gold lining.

PC_DIYumbrella_close.jpg

Step Three: Press the gold paper lining to the bottom of the white vinyl cloud. 

Step Four: Press the clouds to the interior of the umbrella. This will protect your design from the wear of the elements. I kept the clouds to the lower portion of the umbrella, with three on each panel, so that I could still see through the bubble. Decide on how much vinyl coverage you want on yours.

PC_DIYumbrella_1.jpg

We've had a rainy end to the summer, and this umbrella, with its gold lining reminders is the perfect way to stay happy and dry in the downpours.

If you love this idea, head on over to the Cricut Pinterest board, and repin! I am so appreciative of your support and kindness!

PC_designspacestarlogo.jpg

My team, Lucky #13, has put together a wide variety of incredible projects. And you need to check out every single one! Find the links below. Vote for and pin your favorite projects!

You can also search for our projects on this and upcoming challenges with #cricutdesignteam13

Cricutgearchallenge_Lucky13_fashion.jpg

Lucky 13 team in the Cricut Design Space Star™ team:

  1. Booties, Earrings, and Hearts from Andrea of Andrea’s Notebook
  2. Children's shirt and gold sandals from Celina of Petit A Petit and Family
  3. Cut out leather purse with cross lining from Erin & Tricia of Suburban Bitches
  4. Leather cuff from Monica of East Coast Creative
  5. Easy DIY hashtag t-shirts from Sarah and Jessica of Pretty Providence
  6. DIY umbrella and Pineapple Scarf from MJ of Pars Caeli
  7. Leopard leggings and tank from Sadie Jane of Simply Sadie Jane
  8. Laptop decals from Crystal of Sew Creative Blog
Lucky 13 team picture.jpg
Photo Transfer Journals: Endless Summer Projects

This post is sponsored by Bing.

It's always awesome to end with a grand finale, right? Well, Miss Amy of This Heart of Mine has pulled it out for us! Today brings us to the close of our Endless Summer Projects series.

I'm a journal hoarder...err, I mean, I appreciate a beautiful journal or sketchbook. Amy has this great process for showing us how to transfer your photographs to journal covers. The final result is spectacular! What a great gift these would make.

These makers are so good at what they do, and I've been truly blessed to work alongside them yet again. Oh, and we have a few more projects up our sleeves... with sparkle and disco balls and all that jazz. It's not the end of this collaboration by a long stretch!

To catch all of the Endless Summer Projects, catch up with the series here:

What was your favorite project of the summer?

xoxo, MJ

PS. For all of you headed back to school today, like we are, best of luck for an amazing year!


Lunchbox Whiteboard: Back to School
MJ-whiteboard-DIY-logo.jpg

Celebrating back to school around here means that we're getting a whole host of lunch box notes ready to go. These little love notes have become a treasured part of my communication with the kids while they're away at school. We retell jokes on roadtrips, and my oldest is challenging herself to come up with original jokes all the time.

When they heard that I was going to be doing a back to school project, they asked for a little something special for their lunches. Hence the birth of the lunchbox whiteboard.

This project is a breeze to make (you can even have your kids make it themselves), and it will bring smiles for a long time to come!

PC_bts_whiteboard_1.jpg

Grab an inexpensive, small frame (we bought ours at CVS, and it's 3"x3"). Painting is not necessary, but we wanted chalk paint on the frame so that it could be decorated for special occasions like holidays and birthdays.

Trim a piece of notebook paper to fit in the frame. Assemble.

Write your note, create your joke, or draw your doodle with a dry erase marker.

Top the note with a piece of transparency trimmed to the size of the frame. This helps to keep the note from wiping off while it's in the lunchbag. It also allows your child the opportunity to write a note back to you. My children have already discussed a rating system for my jokes. :)

I recommend keeping the frame in the front pocket of a lunchbag if possible just to keep the food and drinks away from the frame. If that's not an option, consider wiping down your frame and pen as you pack the lunch.

PC_bts_whiteboard_2.jpg

If you're looking for joke ideas, follow me @parscaeli on Twitter or Instagram or Facebook to see a daily joke. We'll begin a fresh school year of giggles next week. And you can always search the archives by following #pc_lunchboxnotes (over 100 in there to get you going).

Aannnd...

I have one more awesome surprise today. We're making chic mouse pads as a part of this series. Head over to Frock Files to see the incredible work of Joy. So good. The watercolor effect and the perfect typography.

Thanks to all who helped out with this awesome week of projects. It's been a blast to see how everyone gets ready to school in their own very cool way.

Are you ready to head back?

xoxo,

MJ

PC_backtoschool_logos.jpg
DIY Sequin Planter and DIY Colorblocked Pencils

Hi lovelies,

I feel especially spoiled to be able to share two magnificent Back to School projects with you today! Lidy and Rachel did not disappoint on their fresh takes to the season. These two beauties would be awesome first day presents for teachers or special treats for college students and their dorm spaces or...

Because you deserve a little something beautiful this time of year, too. First up, head over to Hello Lidy, and see how she crafted a sequined planter. Glamour meets botanicals. It's a lovely marriage.

And then head over to The Crafted Life and see how Rachel transformed the average pencil into a work of art. Can you imagine these in a bunch/bouquet? Or tucked inside a cute journal? I'm inspired. And I might want to colorblock everything.

This awesome series of Back to School ideas continues tomorrow with an epic recipe. Really. It comes from Lyndsay of Coco Cake Land. Go ahead over there and salivate at the deliciousness. Even more is coming at you tomorrow!! Also, another incredible Endless Summer Project is in store for Wednesday. Ack, so good.

Are you making the last days of summer special? Do share!

xoxo, MJ

Free Printable Back to School Signs

Are you back to school yet? I have a pack of back to school signs for your first day photos that will make them even more memorable. Do you remember what you wanted to be when you were going into fourth grade? Or how about second grade?

Me? (Well, thanks for asking) I wanted to be a ballerina in second grade. And as an upcoming fourth grader, I thought I'd be an artist. Some dreams were closer to reality it turns out, but that doesn't make them any less special.

I love hearing my children's dreams, both big and small. They are each growing fast and sometimes by leaps instead of the increments that I prefer.

PC_backtoschoolprintables_1.jpg

I made an entire free set - preschool-12th grade - of printables for our friends over at Modern Parents Messy Kids that capture your child's future dreams as well as their grade for this year's back to school photography. There's even a set in color and black and white so that you can find the right combination for those first day of school duds.

It's the best time of year for social media, and we want to see your first day photos and share in these little's big dreams. Tag your photos #MPMK_bigdreams and share in the sweet joy of childhood wonder. You can catch all my kiddos over there, too.

xoxo, MJ

Shell Memories: Endless Summer Projects

This post is sponsored by Bing.

Endless Summer Projects returns this week with the perfect way to combine travel and nature. Ali has crafted these adorable shells that capture their summer adventures. They are a sweet way to relive a wonderful experience, and I think they'd make a great conversation starter when put out during dinner parties, too.

We took the family to the ocean for the first time this summer, and the experience of the ocean's tide was a beautiful discovery for my children. Seeing the constant movement and listening to the waves...as well as experiencing all the fresh leftovers the waves reveal...shiny bits of shells, running crabs, bubbles upon bubbles.

PC_esp_shells_2.jpg

Now we have a new way to savor the memories within our shells!

Don't forget to catch up on all of the Endless Summer Project posts:

Bing_Logo_General_Orange_RGB.png
Back to School Geometric Initial Totes

This shop is part of a social shopper marketing insight campaign with Pollinate Media Group® Elmer’s and Wet Ones, but all my opinions are my own. #pmedia #CraftandCleanUp http://my-disclosur.es/OBsstV

PC_geometricmonogramtote_pin.jpg

We are getting excited for school around here, and, to celebrate, we created geometric initial tote bags to hold the after-school supplies. Backpacks, lunchbags, and school shoes of all sorts are filling the store shelves and catalogs in our mailbox. Ready or not, summer is coming to a close and a new school year is about to begin. Quite honestly, it's one of my favorite times of year. The beginning of school is like New Year's, with better Midwestern weather. So much potential bundled up into fresh pencils and new notebooks.

For once, we're ready with school supply purchases. I like to hit Target early to see the entire landscape of what they're offering. I grabbed up this Elmer's and Wet Ones combo pack in the Back to School section. The pairing of these two is genius.

PC_geometricmonogramtote_8.jpg

This year my girls, now in second and fourth grade, are involved in a full schedule of after school activities. We purchased some awesome backpacks, but we were still in need of something to hold the piano books, soccer balls, Daisy folders, choir schedules, and more. Little hands tire quickly at the end of the day and carrying all of the other equipment in their arms just isn't practical anymore.

So, with the help of some Elmer's glue and a pack of Wet Ones to clean up our smudges and messes, we got crafty and transformed some plain tote bags into geometric initial totes that the girls can use every day.

PC_geometricmonogramtote.jpg

We purchased durable canvas tote and drawstring bags, found some acrylic paints in colors that the girls loved, grabbed our Elmer's glue and a paint brush and went to work.

To begin, I drew in a very light pencil, each girl's initials on the bag. I freehanded ours, but you could easily transfer on a large letter image from your favorite font. I'd recommend something simple and bold since the detail of this craft comes through in the geometric shapes.

PC_geometricmonogramtote_1.jpg

Next, trace over your lines with glue, trying to maintain the same thickness in each line. Sometimes you'll catch an air bubble or make your own goober so be sure to keep a Wet One wipe close by to clean up your mistake in no time.

PC_geometricmonogramtote_2.jpg

Once you have your initial outlined, the fun begins! From the edge of a letter, draw a small triangle and then another and connect them. Be silly, go geo-crazy, and surround your letters with shapes. Be sure to leave the inside of the letters clear of any glue. Make sure that the layer of glue you paint is thick and dimensional.

Let glue dry for a good 2-4 hours.

Grab your paints. We chose just two colors for each bag and mixed different shades together to create an analogous palette. Paint each shape right up to the glue, allowing the glue to act as a barrier to the next shape.

PC_geometricmonogramtote_7.jpg

My ladies were quite happy with their new, personalized bags. Fingers crossed for a cleaner minivan.

PC_geometricmonogramtote_6.jpg
PC_geometricmonogramtote_3.jpg

These bags are getting a workout already with soccer practices nearing and piano lessons every Monday. I love that my ladies are so well rounded and involved, and I'm happy they have some place to keep all of their stuff for these busy times as well!

PC_geometricmonogramtote_4.jpg
PC_geometricmonogramtote_5.jpg

So many possibilities with this technique! Find a bottle of Elmer's gel glue to create a washable design for your bags that might need more laundering.

We're on the countdown to school with just over three weeks to go. How about you?

xoxo, MJ

The Curators of the best DIY round ups
PC_curatorsofDIY.jpg

Finding fabulous projects is not as easy as it may seem. These three curators are the ones to follow for the best DIY round ups on the worldwide web.

Before I began blogging, I had little appreciation for what we lovingly term a "round up post." These are typically a list or a collage of ideas or images found around the web based around a particular theme or topic. Searching out the best of the best is a tedious process; it's more than a Google search or Pinterest entry. It's a keen eye, a great sense of design, and a knowledge of what's possible and practical.

Rachel, Marlene, and Sarah post the best DIY round ups to be found.

You've likely seen Rachel's round ups on Pinterest. Her blog The Crafted Life is jam-packed with her process, inspiration, and business-sharing advice. Her themes are unique and her picks are always beautiful. Rachel mixes the complex with the super simple to create a lovely blend for every level of creator. Even when I'm not ready to make one of the recommended pieces, I find myself returning to her pages just to see what's inspiring her and what's trending for DIY. She always has the latest.

Marlene of Jade and Fern has a modern and clean feel to her round ups. I am always surprised by her finds and wishing to find time in my schedule to create such beauty. Though a handful of her tutorial links are outside of my comfort zone, none of them feel unapproachable or, even worse, undesirable. She has her eye set on her brand and every DIY that she selects fits well with her own posts that are in their own right gorgeous as well.

Sarah of Sarah Hearts wins for color and pattern. She finds DIYs with texture, design, and charm. Her projects are just the kinds you want to create for your best friend and yourself. The energy with which she creates her own posts comes through in her picks. My favorite part? She never picks a dud. Every project is fresh, unique and approachable for a variety of skill levels.

In today's busy times, finding great projects can be a challenge, or at least a time challenge. Follow these three curators for only the best of the best. You'll appreciate their careful editing and helpful suggestions, I promise.

Who would you add? Who always finds just the right project?

xoxo, MJ

Stamped dish towels

Move over hedgehogs, bunnies, and owls - squirrels are the new hipster animals. I'm sharing a fun project, stamped kitchen towels, using the charming icon of Squirrelly Minds. I think it's the perfect blend of practicality and whimsy.

140710-pars-caeli-stamped-squirrel-towels_2.jpg

Have you made your own stamps? I've only recently gotten into the gig, and I may have already made a dozen or so with my kids. The power of making your own patterns! Admittedly, the carving of the design takes some patience, but the final results are completely worth it.

140710-pars-caeli-stamped-squirrel-towels_3.jpg

Head on over to Squirrelly Minds to see the full project. I think the towels would make a great housewarming present or hostess gift for those early fall dinner parties with friends.

xoxo, MJ

Screen Printed T-shirts: Endless Summer Projects

Screen printing t-shirts are a great way to give your child something really unique that they love. Our next Endless Summer Project comes from Amy over at This Heart of Mine blog. Her kids are adorable and so is this fabulous project.

We love to tie dye, and I'm excited to take our creations to a new level with this tutorial. Also, you need to check out all of the cute designs that Amy created for his kids wearables.

Next week Melissa of Lulu the Baker has an awesome project that the whole family will love! Tune in on Wednesday.

Catch up on all of our Endless Summer Projects:

Don't forget to tag your projects #endlesssummerprojects so we can see your creations and join in the fun!

xoxo, MJ

DIY Puppet Show

I'm sharing a quick craft you can make for and/or with your children today over on Classic Play. Puppet shows are always fun, no matter the season or occasion. We created our own mobile theater that fits in our doorframes by transforming a pillowcase into a stage curtain.

It's an easy project that will last you all summer long. We also made paper bag puppets (remember these?), and you better believe that sock puppets are on tap for another project this summer.

IMG_4880.jpg

Click on over to Classic Play to see all of the details! See you back here tomorrow for one crazy good circus for Endless Summer Projects!

xoxo, MJ

Mid Century Modern Bird Feeders: Endless Summer Projects


This week's Endless Summer Project is a real treat from Melissa of Lulu the Baker. Combine the love of color, architecture, and modernism into one fantastic project for the family to create. Her midcentury modern birdfeeder is simple in design, with full instructions included.

We love watching the birds in our backyard. With the warm temperatures, we've been eating dinner out on the deck and have discovered a momma robin feeding her nest of four babies in one of our plum trees. When I mention to my three that they once resembled those desperately hungry hatchlings, they snicker and giggle. It's awesome to watch another family in its beginning stages.

Hop on over to Lulu the Baker to get all the info you need to make one of these modern birdhouses, and be sure to check out all the other projects we've had so far in the Endless Summer Projects series! Next week's post is a full on circus to delight...

  1. The printable summer banner from Classic Play
  2. A large-scale art project with tape from Pars Caeli
  3. A ready-to-go, free printable scavenger hunt from Alexandra Hedin
  4. A collapsible cardboard playhouse from This Heart of Mine
  5. This mid century modern bird feeder at Lulu the Baker

 Happy summer? Have you started any projects yet?

xoxo, MJ


Large scale art with Wayfair

Wayfair offers a zillion things home – the largest selection of home furnishings and décor across all styles and price points. For more information and inspiration, visit Wayfair and follow Wayfair on Facebook, Twitter & Pinterest. Wayfair compensated me for this post but all opinions and project ideas are mine.

PC_esp_largescaleart_pins.jpg

Welcome to week #2 of Endless Summer Projects! I'm delighted to team up again this week with my blogger pals: Ali, Melissa, Jen, and Amy. We taking our project to the big leagues this week with a large two foot by three foot canvas. Grab your favorite tapes and some scissors and let's get to work.

PC_esp_largescaleart_1.jpg

When my little guy L was an even littler guy, we took he and his sisters to the Art Institute of Chicago. They ate up all the painting and sculptures, but the wing of modern art was a favorite. At 2, L fell in love with this giant striped piece and ever since then I've been thinking about how to bring this idea to his space.

PC_esp_largescaleart_old.jpg

With all of the awesome washi tape and duct tape varieties now available, this striped project got a whole lot easier. The supply list is simple: a large canvas (the large scale can better handle the wide variation in pattern), tapes, and scissors as well as your favorite stripe lover. L is just a little bit bigger than this canvas, which was a fun way to note his relative age/size as we were creating this together.

PC_esp_largescaleart_3.jpg

We decided together that we wanted vertical stripes, and we began off center so that we could create a non-symmetrical striped pattern. You can predetermine the order of your stripes or do what we did and create balance as you go by making some of the stripes extra thick and others thinner.

PC_esp_largescaleart_4.jpg

Secure each stripe by extending the line to the back of the canvas. Perhaps the most challenging part of this DIY (though none of the steps would really be considered challenging) is making sure that your lines stay straight as you pull the tape down the canvas. Little hands can easily select what colored stripe comes along next and guide the roll of tape as you straighten and trim the ends.

PC_esl_largescaleart_5.jpg

Let's just say this project had us at hello, and L was so excited with his new canvas, even if it had one lone stripe. But we kept moving forward, mixing up the width of tapes as we added new colors to the canvas.

We had five different colors and a windy day, but all in all this project took us 30 minutes from start to complete in his room.

L and I worked together to hang our new artwork above his dresser. It already houses some Wayfair pieces! And I've been looking at these three as other fun additions to this big boy room (a fire extinguisher water hose is the best)!

PC_esp_largescaleart_wayfair.jpg

Wayfair Firefighter Gear  + Whitney Bros Mirror  +  WallCandy Arts Mural

PC_esp_largescaleart_6.jpg
PC_esp_largescaleart_9.jpg
PC_esp_largescaleart_7.jpg

The finished art offsets L's very special items and pops all the bright colors in the room in a fun and festive way. L pulled out a classic quote on me while we were making this, "Mommy, whenever I look at this, I'll think of you and all the fun we had making this!" Awh. So sweet. How could I not give this kid something special?!

My blogger gals and I are hopping around today to show off our favorite picks from Wayfair for children's and tween's bedroom and playspace. Click on over and see the adorable ice cream supplies with Alexandra, the colorful picks at Lulu the Baker, the chic art prints at Classic Play, and all the animal love you could want at This Heart of Mine!

Alexandra Hedin, Lulu the Baker, Classic Play, and This Heart of Mine

If you missed it last week, be sure to grab Jen's printable summer banner for end of the academic year celebrations that kicked off our Endless Summer Projects series. Thank you all for visiting and sharing and enjoying time spent with your kids in the creation process!

xoxo, MJ

Summer Banner Printable: Endless Summer Projects

I can hardly believe it! It's that time of year again?! Bring on the Endless Summer Projects! Jen, Alexandra, Melissa, Amy, and I have been working for months to put together a fun, creative collection of projects. Well, it wasn't all work...there was a fair amount of laughter, sharing, and good old-fashioned sarcasm thrown around to get us to today.

Over these next 15 Wednesdays, stretching us long into August, we'll be sharing some fabulous ways to spend time with your children this summer and soak up all the sun-kissed joy of summer!

Most of us are not yet into the official summer schedule. We have 19 days left of school (but who's counting, right?), and I'm always looking for memorable ways to celebrate the close of another year. Our typical tradition includes stopping by teacher's classrooms to thank them for a good year and enjoying a lunch out all together, since the last day is typically a half day.

Jen of Classic Play has a great printable banner ready for all of us to celebrate! Imagine the joy of your children breaking through the streamers as they run out for the bus or into the car.

Click on over to Classic Play to get the downloadable pdf and get it ready for your end-of-the-year party. I want to put one on our minivan and maybe one on their bedroom doorframe the morning of the last day.

What are your year-end traditions?

xoxo, MJ

P.S. I'm hosting next Wednesday's project, thanks to our friends at Wayfair. Grab a large canvas and some washi tape...


Make it together Mother's Day
PC_mothersdaymake_1.jpg

May is a busy month with birthdays, year-end celebrations, sports, and Mother's Day! Sometimes special dinners out and shopping trips don't make the final agenda before Mother's Day. And though I sometimes enjoy the quite solitude when everyone leaves our home, I really love experiencing all of us together in this space - making and creating.

So why not craft together as an activity for Mother's Day? Or have your children to create alongside special grandmothers or aunts for a sweet Mother's Day experience?

PC_mothersmake_2.jpg

This is an incredibly budget-friendly (slightly time intensive) craft that all three of my children enjoyed. Gather together:

  • Paper (we chose rainbow and only used one piece of each color paper to make all the beads here)
  • Scissors or paper cutter
  • Glitter glue (really, any glue is fine, but glitter makes everything better, right?)
  • Pencil or pen (to wrap the paper)
  • String or twine for necklace/bracelet/anklet creations
PC_mothersmake_3.jpg

First step? Cut isosceles (ish) triangles out of your paper. Ours were about an inch at the thick end. Here's the important next step: begin with the thick end and tightly wind the entire triangle around the pencil. We made different shapes by doing this. Some beads were exactly symmetrical, some looked more like cones or party hats, and others looked like a wobbly top.

PC_mothersmake_4.jpg

As you get close to the end of the wrapped paper, squirt a dollop of glitter glue on the front and back of the end tail and graciously smear it all over the end and the rest of the bead. This will help secure the tight wrap and spread the glitter around the whole bead.

Once the bead is secured, carefully remove it from the skewer and let it dry for a few minutes before crafting further.

PC_mothermakes_5.jpg

String your handmade beads for necklaces and bracelets that are one of a kind. You'll have the finished product made from little hands, and the priceless memory of the entire experience as a special Mother's Day treat.

PC_mothermakes_6.jpg

Happy Mama's Day! And happy crafting!

xoxo, MJ

Pop of color in a big boy room
This post is a part of the Wayfair Homemakers network. I was compensated for this post, but the selections and opinions are my own.

My little boy has been in a big boy room for over a year now. I thought that I'd have his new space all decked out and ready to go before he ever moved from his crib and the nursery. But, as it turns out, L had and has a lot of opinions of his own (seems that I raise opinionated people.) So he's had his main furniture pieces (a great bed and dresser with bookshelf), and we've slowly, oh so slowly, been adding bits and pieces of his style into the space.

L loves color especially orange, and, if I'd let him, he'd go construction-zone orange all over. Instead we've compromised with bits of orange and other bright colors sprinkled around. Also, at four, he's a big Disney lover. Just in case that deep passion doesn't last we've expressed that love with accessories that can be moved in and out as his taste grows.

To complete his dresser, L "decorated" the surface with these very cool, colorful favorites. I applauded his choices and promised that we'd keep each of them. To add a few pieces with less shine and squish, I looked to Wayfair I was on the hunt to add texture and dimension, even a vintage flavor, to his room to compliment the warm woods and the worn-in madras plaid.

Red bucket, blue milk crate, green plantstand, and striped pouf all available at Wayfair

I fell for the red bucket first, and I loved that I could search by line to discover some other great pieces that had the same worn charm to contrast the new and shiny that L had picked. The plantstand seemed like a perfect corral for favorite stuffed animals, and small toys could look more precious when displayed in a milk crate.

We added his artwork and very favorite toys. His donut painting from his sister's birthday party served as a bright backdrop to the more subdued tones. And the homemade shoebox frame is a virtual brick for the Lego clock that rests upon it. And finally the rubber dinosaur has a place to rest.

The Disney friends resemble the "Three Men in a Tub" and add a bit of whimsy to the vignette. Also, it's a complete bonus that the green plantstand makes a great imaginary space shuttle, train, and manger when pulled into play!

When my parents visited last weekend, my mom wanted to know where I'd gotten these great antiques for L's room! I snickered and told her they were new from Wayfair I'm still not sure if she believed me. Both pieces have such a nice patina and are made with quality that they make a convincing set of antiques.

His dresser space is now one that is interactive, an open-space toy box, complete with shiny and aged treasures. It's also a space that changes often, as L adds favorites and takes down the plantstand and milk crate to imagine them as some magical addition to his imaginative play.

Stay tuned this summer for a very special piece of artwork that L and I are creating together to hang in his bedroom - it's the perfect DIY for little boys!

So now it's your turn. Are you ready to add some pops of color into your home - indoor or outdoor? The kind folks at Wayfair are letting me giveaway a $100 gift card. All you have to do is comment and link to what you'd purchase with your gift card from Wayfair!! For additional entries, follow Pars Caeli on Facebook and Twitter.

Hurry, hurry, friends, the giveaway will close on May 1 at 12AM EST (only one entry per person). Share this special treat with anyone you know who could use a pop of color in their lives.

Eek! I can't wait to see what goodies you find. Don't forget to link in your comment!

Happy hunting!

xoxo, MJ

a Rafflecopter giveaway


No purchase necessary. By leaving a comment you agree to the rules of this sweepstakes. Each comment to this post equals one entry and must include a name and valid email address to be eligible. A comment must link to a product from Wayfair.com to be considered for this sweepstakes. One entry per household. Limited to entrants over 18 in the US and Canada, residents of Florida, New York, and Rhode Island are ineligible to enter. Contest begins as of the time of this post and ends on Thursday, May 1 at 12:00AM EST. The winner will receive a Wayfair gift card/promo code, a retail value of $100 US. The number of eligible entries received will determine the odds of winning. All comments will be numbered in the order they are received and the winner will be chosen randomly by MJ using the Random Number Generator at random.org. Winner will be notified by email at the address given in their entry and must respond within 72 hours to receive their prize. If the winner does not respond within that time, a new winner will be chosen. The prize will be provided by Wayfair.com. Pars Caeli is not responsible for any problems with receipt of the prize. This contest is governed by the rules of Massachusetts, void where prohibited. This sweepstakes is sponsored by Wayfair LLC, 177 Huntington Ave., Boston, MA, 02115.

 
Charlotte Moon + A Giveaway

Hello lovelies, I've missed you. Due to an avalanche of work, a quick travel change, and a little matter of exhaustion, I had to take an unexpected blog break this week. I promise to still throw you the fabulous content that I had planned and spare you the melodrama of the details.

I'm so excited to re-introduce you to my pal, Claire. She's been on Pars Caeli before talking about life in Ireland (she is the big sis of one of my best friends and greatest people on Earth) and shared an amazing DIY on turning children's art into pillows. Claire hails from Northern Ireland and has recently made some dreams into reality by opening up her own store. I've been waiting to see her bloom into this, and I'm so excited to show you the first products from Charlotte Moon.

And I begged Claire to let me offer a piece of her collection to you beautiful people. And guess what? She agreed.

And that's awesome. And supporting people who follow their dreams? Well, that's even better. We should all do a little more of that (both the following and the supporting).

I interviewed Claire to learn more about how she decided to take this leap. Here she is in her own words:

I've been pretty obsessed with crafting since I was about 6 when I made a fabulous train out of matching boxes! My parents were always great about abandoning the dining room table to the latest project and messy creation and humoured us in the journey through knitting, embroidery, papier-mâché, sewing and paper crafts.

Charlotte Moon has been a project which has come to fruition after several years. Working as a divorce lawyer, I always made wedding invitations for friends to balance out the romantic karma! After having a car accident and some back surgeries, I've taken some time off to recover and Charlotte Moon has been a fabulous way for me to focus on my creativity.

I finally decided to launch my crafts in a more formal way in late 2013. I love parcelling up cards and buntings and baby presents made with care and posting them off all over the world! In terms of my favourite crafts to make, my heart will always be with the card making. I love receiving mail, and as a result I absolutely love sending cards to people for all occasions! I relish coming up with new designs for cards, and you can make cards anywhere! Mind you, the name buntings hold a very special place in my heart.

To order any Charlotte Moon goodies, email Claire at charlottemoon1@gmail.com

Claire is giving away this sweet birthday banner above, and all you have to do is like Charlotte Moon on Facebook and leave a comment below. Giveaway contest ends Sunday midnight (EST - US time)

I'll be back tomorrow (surprise Saturday treat!) with some really cool stuff.

xoxo, MJ


5 ways to use social media to boost your creativity

It's just not true that we run out of ideas or we lose our creativity. The more we exercise our creative muscle, the more we are able to produce outstanding results. Nevertheless sometimes we hit walls or feel in a fog. And sometimes social media is accused of bringing us to this state of saturation or complete drought.

I use Facebook, Twitter, and the rest to spur my ideas, and you can, too. Here are five ways to use social media to boost your creativity.

1. If you're on social media, you're likely to have a favorite or at least a favorite for now. As a graphic designer and a visual fiend, I adore Instagram for inspiration. Find the feeds that will make you want to dive into the images and bask in the compositions. Use Instagram to observe all you can. Take note of the tones and shadows, the mood expressed in the images (and how this is achieved), the caption and/or story that accompanies the photography. How can these influence your work? Which posts feel "successful" to you and what elements can you bring to your own creations?

2. Facebook has changed quite a bit in its ten-year history, but it still has the power to put fresh perspectives right on your screen. How so? Start a conversation. For many of us, the majority of our connections still hang out on Facebook. This is a perfect opportunity to reach out and leave messages. Ask questions from your experts and gather collective feelings. Wondering how to find the best new apps? Ask your friends. Looking for fresh ideas on summer vacation? Solicit others thoughts.

3. I find Twitter to be the most charming of the social media that I use. From the silly hashtags that folks post to the easy back-and-forth of short communication to simple sharing of interesting links, Twitter can give you the quick feedback that you seek. I often use my feed to see what is on the minds of influencers and what are the quirkly, less popular, conversations going on that really bring something new to the table. Twitter can also be one of the easiest ways to break a train of thought (in the best way), and redirect you to another concept. It's also incredibly easy to spend endless time on this network so be sure to set your limits.

4. Google+ is an intriguing platform for inspiration. Much like Instagram, it favors the visual, and much like Twitter, you can utilize hashtags to find related information. I use Google+ to search out keywords and see what ideas and images come through. In my experience thus far, I've found a wide breadth of expressions on the same topic, and I've been inspired to think in ever-widening circles just as the platform's process itself implies. Add your post to Google+ and tag it, click on that tag, and read the myriad of other tidbits to broaden your perspective.

5. Pinterest is an amazing source of creativity for some, while others intentionally keep a distance from it when they are looking to imagine. I use Pinterest much like I did college art assignments. Let's say I want to do an Easter egg project - I first look through my board to see what's caught my eye, and in particular I look at pins that have been added to wrap up posts or projects that have a lot of repins.

And then my brainstorming process begins. I think through and write out all of the "obvious" connections to the most popular ideas, and get all of the imitation ideas out. That process of getting it all out allows me to unearth something fresh. In many ways, Pinterest is most helpful in giving me the fodder I need to run the other way, but in the right direction. I go back to my boards to look at other processes folks have used to see how I might incorporate something unexpected to this new effort.

How do you boost your creativity? Do you find social media helpful in this?

Can't wait to hear your thoughts!

xoxo, MJ


Before you go!

Happy Friday, friends! This week has been off all together so I'm running with it, and I have a few things I really want to show you before you go.

1. Joy always brings us the best of the best, and TED talks are no exception. I loved the idea of success and grit. I've been kicking it around this week...I'd love to hear what you think.

2. Before she shuffled off to Istanbul with her talented husband, Jen left these simply adorable Easter cards for all of us to download and share. So sweet!

3. The story of art and painting and motherhood beautifully captured in two minutes.

4. Love how Rachel is styling this new space.

5. These are the eggs to make.

6. And, seriously? From 1000 to 10000 in three months on Pinterest. Here's how Amy did it.

Happy weekend, lovelies. Let's make it a bright one. Beauty awaits us.

xoxo, MJ


Flourescent and Gold Leaf Flower Vases
This post is part of a social shopper marketing insight campaign with Pollinate Media Group® and All You Magazine, but all my opinions are my own. #pmedia #lifeforless http://my-disclosur.es/OBsstV.
PC_budvase_4.jpg

Happy Monday, lovelies! What a treat to be greeting you at the very beginning of your week.

Temperatures are warming; we even saw our first bulbs peeking through the mulch this weekend! Spring brings fresh blossoms with their gorgeous color and fragrance. I love to bring in bunches of lilacs and snips of hyacinths and tulips, too. Often, after the larger bouquet has lost its brilliance, when one or two blooms remain fresh, I like to float them in a bowl to savor their beauty a few days longer. And more often, my three children find "daisies" (AKA: dandelions) and peonies they want to bring in to our house to cherish.

With no specifically charming bowls to hold the buds and flower heads, I went out to search for floating bowls. Nothing I found seemed unique enough to showcase our buds. I did, however, fall for these cute ice cream bowls. The shape was just what I had in mind for a "personalized" size of bowl - perfect for place-setting color, sparkle on a tray, or brilliance on a desktop.

PC_budvase.jpg

To transform the ice cream bowls, I ran over to our local Meijer and grabbed frosted glass spray paint and flourscent spray paint. And I had some gold leaf paint on hand, just a small bottle, from another project. It was more than enough to gild the interior of the bowls. I took this entire project outside and grabbed a box from the recycling to keep me from overspraying.

Follow the direction on your paint can! The frosted glass paint I used required three coats in order for the glass to reach a filmy state, a slight texture in which another paint would be more likely to adhere. Drying time for each layer was only 10-15 minutes so the process went rapidly.

PC_budvase_1.jpg

Once I was happy with the frosted (slightly textured) nature of the glass paint, I added the flourescent! Neon when used sparingly can add a lot of life to a room or table. This pink-orange shade was the perfect burst of tone I wanted to compliment the warm weather. The picture below shows off the look of the new vases after three coats of the flourescent. If you want your vase to have more of a tinted look, paint on only one or two coats. For a glossier, opaque feel, keep adding layers!

PC_budvase_2.jpg

Next up, making it golden. Beware, gilding objects might make you want to treat everything with a fresh wash of gold. It's amazing how simple objects can turn from ordinary to treasure with the addition of gold leaf. My paint was oil-based (to help with the waterproof nature), and I let the two layers dry overnight.

PC_budvase_5.jpg

And voila! $3 ice cream bowls transform into show stopper flourescent and gold flower vases!

PC_budvase_6.jpg

The colors from the new magazine, All You, inspired this palette, and I'm pretty sure that the golden pool of water will make even our common dandelions look pretty spectacular.

PC_budvase_8.jpg

All You is available at many national retailers including Target, Safeway, Kroger, Dollar General, and Meijer. Grab a copy for yourself by using this $1 off coupon while supplies last.

PC_flowervases_pin.jpg

And for this project or so many others you may have on your to do list, I'm giving away $50 to Meijer stores. Enter below for your chance to win!

Here's to a great week, golden and bright!

xoxo, MJ

Entry

-Form