*This post is sponsored by Minted. All opinions expressed are my own. Thank you for showing love to the brands that support Pars Caeli!

We're a few weeks into school now. Can you believe it? My 5th, 3rd, and Kindergartener are humming along with their daily schedules and evening activities. And in order for me not to completely use my mind, we have our systems in place. I still find that I lose my phone or forget someone's library book way more than my wishful, maximizing self would like it.
How can we make our days smoother? Less forgetful? Happier? I'm always analyzing and wondering if we could set up our home or our schedule differently to make our days better. So many organizational systems and DIYs are out there (SO, so many, dear Pinterest). However, most of them are not the kind that I want to put in my home. Organization doesn't have to be ugly! Take those cute Minted labels (see above photo) that are saving me many trips to the Lost & Found box.
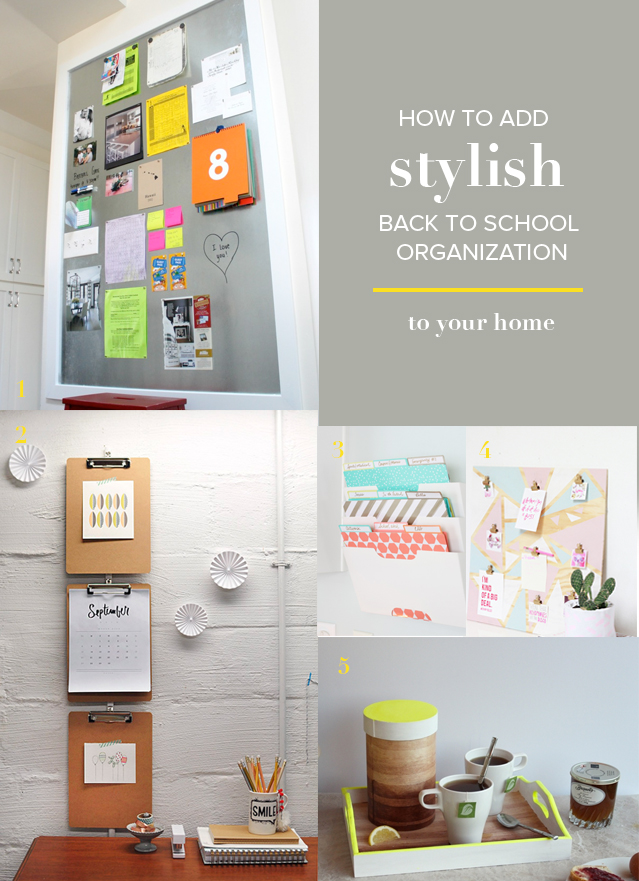
An organized school year is a happy one! Of course, no one wants to skimp on style for the sake of tidy. Here's how to add stylish back to school organization to your home.
Inspired by the combo of style and organization, I'm putting these fabulous projects on my fall to do list. They not only make lives more efficient but make (or keep) your home super styling, too. Win!!
1. GIANT MAGNETIC BOARD
I swoon over this one! We have a chalkboard wall in our kitchen, and I feel like this magnetic board would be the Gandalf version. Michelle of 4Men1Lady has created this command center that's chic, textural, and completely multipurpose.
2. CLIPBOARD HANGER
Clipboards as frames or easels? Bring it on. Why couldn't schedules, calendars, classroom projects be displayed so beautifully? Amy of Delineate Your Dwelling created this piece to hang clipboards, and it's brilliant and sweet on the eyes.
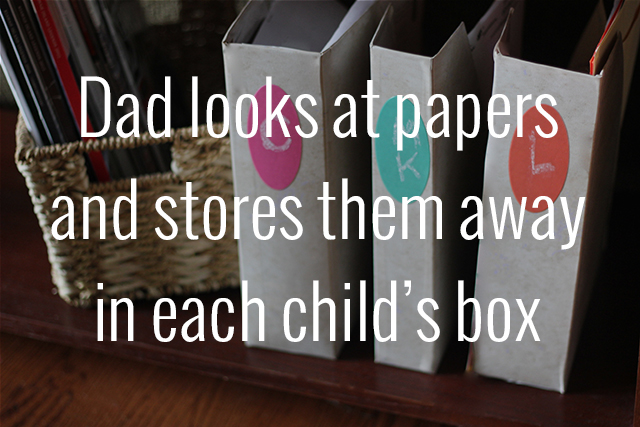
3. FOLDER HOLDER
The papers that need to be kept for reference throughout the school year? Where should those go? We put ours in a folder holder, mounted right next to our exit door (by the garage) and are easy for people of every height. :) I think the way Summer of Simple Stylings beautified hers is perfect. Who wouldn't want to add to this lovely?
4. ORGANIZATION TO VIEW
The passwords, phone numbers, permission slips, special tickets - they also need a home and often one where they can be seen! Laurel of A Bubbly Life has this chic geometric board idea that I think would fit right in.
5. TAKING IT TO THE COFFEE
This project from Lindsay of Shrimp Salad Circus is perfect for the grown ups. Keep your supplies in check, too!! And make the morning rush a breezy, chic moment. Why not keep all your coffee/tea supplies on a gorgeous tray? It's enough to make you feel special and cared for even in the early AM.
What's your favorite way to incorporate organization into your home design?
XOXO, MJ