#Mother

Motherhood has been on my mind more than usual. With pals becoming new moms, turning the page onto a new decade myself, and Mother's Day upon us, I've been seeing motherhood from a lot of different angles.

Join our Mother gang because mothering is hard enough without friends. In love and support of all mothers.

Join our Mother gang because mothering is hard enough without friends. In love and support of all mothers.

I will not judge; I will love instead.

I've always wanted to be a mother and pictured myself as one. I've been formulating what that picture looks like since I was a little girl. In many ways, all that I've learned, I learned through the lens of wanting to teach it to my future children. I have evaluated the world, other people, and myself through this lens of the best mother.

And in that light, I have critiqued other parenting styles and choices. And when I became a new momma, I was super critical of myself. Am I doing this right? Is she sleeping enough or too much? Should I be nursing more or less? Do I keep her stimulated or too much so? So many questions ran through my head, judging every move I made.

I will not judge; I will love instead.

We had our second child when our first was two, and I heard others judgments. Are you ready for another? How many are you going to have? I think two years is too close. I think two years is too far apart. How old are you now? Are you really going back to work?

Adding to my own self evals (that were still coming up less than glowing), I heard the voices of "them" - those people who don't really matter in our regular lives but we somehow give power to when we're making important life choices.

I will not judge; I will love instead.

I'm a mom, three times over now. My oldest has been on this earth a decade now, and my youngest can speak in paragraphs. My inner critic is quieter or has a better sense of humor. And the "them" have evolved with new faces and new questions/advice/unhelpful observations.

And I see moms making the same, the opposite, or slightly similar choices to my own. And whether it be my age, my faith, my exhaustion, or my wisdom...

I just want to love them.

To walk up while they are fighting with the onesie diaper change. To high five while they're trying to wrestle with the toddler in the carseat. To hug when the child screams loudly and repeatedly in the middle of Church. To offer knowing respect when the tween spouts off disrespect. To hold hands as the middle schooler takes first steps into high school. To hold our breath on the first night that curfew is actually used.

I will not judge; I will love instead.

You always wanted to be a mom.

You weren’t sure you wanted children.


You work.

You stay at home.

You do both.


You cook.

You have the pizza guy on speed dial.


You breastfed.

You bottle fed.


You craft the day away.

You buy pre-made Valentines.


You lost the baby weight.

You just call it weight now.


You think motherhood is rewarding.

You think motherhood is challenging.

You think both.


Yet...

We are paralyzed by the thought of them growing up.

We worry if they’re getting enough vegetables.

We cry.

We wish for just five minutes of silence.

We fear we aren’t doing it right.

We understand our own mothers now.

We yearn for unsolicited hugs.

We feel guilty.

We stand in awe at their accomplishments, big and small.

We grieve when another has lost a child. 

We love hard.

We have a common thread.

And it is #mother

I'm joining in the #MotherMovement. It's an effort begun by Sara Moore, and it begins with the statement above called the #MotherManifesto. It's a commitment to lift up all mothers. To stop the mommy wars and the bickering. To support. To listen. To love.

I will not judge; I will love instead.

There's a lovely Mother Gang of incredible women steering the ship, and we'd love you to join in. You're a #motherlover, aren't you? We're real people who find mothering hard and amazing and exhausting and worth it.

Head over to Mother Manifesto to read more about this movement!! You'll see more about it here on Pars Caeli over the next months. And we have a pretty kicking giveaway coming up next week, too.

Put aside your differences to lift all mothers up and support them in whatever way they need.  Commit to the #mother community, to the village we always hear about, that we all need as mothers to make it through with our sanity.

Put aside your differences to lift all mothers up and support them in whatever way they need.  Commit to the #mother community, to the village we always hear about, that we all need as mothers to make it through with our sanity.

JOIN OUR MOM GANG. BECAUSE MOTHERHOOD IS HARD ENOUGH WITHOUT FRIENDS.

And to all mothers out there, you are loved.

xoxo, MJ

DIY Children's Hand Dish
A sweet, homemade gift for mothers and teachers! Make this one with your child from air dry clay.

A sweet, homemade gift for mothers and teachers! Make this one with your child from air dry clay.

Children's handprints are such a lovely way to capture the littleness of childhood. As a mom, I save all of the construction paper tracing and funny animal crafts that come home using my children's hands. I just love them!

When my friend Jeran, posted these fabulous photo holders made from air dry clay, I immediately thought of my children's handprints! I wanted to create with these small shapes in such an easy medium. And then the usability of a small dish evolved as we were playing with the flexibility of air dry clay.

A sweet, homemade gift for mothers and teachers! Make this one with your child from air dry clay.

A sweet, homemade gift for mothers and teachers! Make this one with your child from air dry clay.

I purchased Crayola's tub of clay to give it a roll. First we took about a baseball-sized ball of clay. It's softer than potter's clay and easy to manipulate. Using a rolling pin, we flattened the clay and traced out L's hand with a pencil on the clay.

He removed his hand, and I carefully pulled away the excess clay. If you're trying this, make sure that you have clay rolled out to about 1/4 inch in thickness. Too flat makes the hand plate too flimsy and too think makes the fingers hard to move. Using a spatula, I lifted the palm and fingers to allow them to dry on an armature for shaping.

PC_childrenshanddish_1.jpg

I'm all for working what you have so I grabbed some unused measuring spoons to prop the clay into the bowl-like shape I wanted. Follow the instructions on the container to make sure that it's dried completely before you move it. You'll notice that it turns more bright white as it dries.

PC_childrenshanddish_5.jpg

My children loved seeing their hands as art! And they thoroughly enjoyed making an object they knew their teachers and grandmothers would use on their desks or dressers.

A sweet, homemade gift for mothers and teachers! Make this one with your child from air dry clay.

A sweet, homemade gift for mothers and teachers! Make this one with your child from air dry clay.

Have you worked with air dry clay? You should give it a whirl if you haven't yet!

xoxo, MJ

How to Recover from Vacation
Re-entry back to reality is never easy. Here are a handful of practical tips to get you enjoying life at home again.

Re-entry back to reality is never easy. Here are a handful of practical tips to get you enjoying life at home again.

A fabulous trip away to somewhere tropical/relaxing/exciting/adventurous that made you feel ecstatic/in love/rejuvenated/calm. And now you have returned home . . . but almost all of you wants to be away and still on vacation. Don't get me wrong, home is where the heart is, but sometimes that heart needs a change or a rest.

Today, I'm writing this post for me and for you. I've had this blog window open, ready to write all about how I bounced back into real life, since we, my husband and I (sans kids) returned from a whirlwind trip to New York City with friends nearly ten days ago. My pal, Emer, and I had always imagined that we'd celebrate our 40th birthdays in NYC together. Emer and I are long-time friends, but an ocean has kept us away from frequent visits, she being a native-born Irish beauty, now living back home, married, with three little boys. However, all the planets did align, and we were somehow able to make a grand double date of a 3-day weekend and take on the town.

So, in writing this for the both of us, I did some searching around to see how other good people kick themselves back into gear. The Happy Gal has ideas for how to keep your family on track and your home in order before and after vacation. These are awesome and ambitious. Road Warrior Voices has a great idea to return from your trip a day early to give yourself time to do laundry and to ease back into routine. The site has a useful list of ideas for longer vacations but one not quite as practical for a long weekend vacation.

Here are my top four ideas to get you back into your groove after a wonderful time away:

1. Remember that this does not have to be the only trip and plan for the next:

Perhaps you might be feeling a sense of disappointment, the post-Christmas blues sort of feeling, that now the time you'd be looking forward to is over. Plan the next time for wonderful! Whether it's a 2-week international excursion or a quick roadtrip away, give yourself something new (and doable) to look forward to! It's good for the mojo and keeps you pushing forward, rather than looking behind.

2. Capture a memory or experience in a special way and keep it in front of you:

Souvenir shops are big money makers for a reason! Whether you found something(s) precious on your journey or snapped oodles of photos, make sure that you put those reminders in prominent places in your life. By this I DON'T mean your display shelf. Pop a silly photo in your wallet or pin the cute card to your bulletin board at work. Walgreen's has great deals on black-and-white, super large prints if you want to plaster something large on your wall. Chatbooks are my new favorite way to capture your Instagram photos in a beautiful way!

3. Get (back) to sleep and healthy eating:

Upon returning home, I was hit with a sinus infection *BOOM* which, in turn, prompted me to eat less healthy (what, Sonic burgers don't cure sinus headaches?). Being under the weather did force me to sleep more, which was helpful as I don't sleep much before trips (trying to get everything together) or on them (trying to enjoy every moment). I also allow myself to indulge in high calorie decadence when I'm traveling so I usually come home feeling full-er than I left so returning to salads and green smoothies has helped everything feel back on track.

4. Find small ways to relive the experience and share it with those around you:

What was the best part of your trip? The deep sea diving? The long stroll along the river bank? The amazing book you were finally able to read? Share those!! While no one REALLY wants to see all of your vacation photos, your coworker might be looking to hear about a great, new location to visit or your neighbor enjoy the book recommendation. And seeing them experience something you loved helps amplify the joy of the journey, too. Even simple things like texting a photo of your vacation time together can help transport your loved one back to a beautiful memory.

When was the last time you spent some time away? Even if it's only for an afternoon, you'll be surprised by how much joy you can sustain from the experience!

xoxo, MJ

How I Donate Life: An Interview with Kelly from Cloudy Day Gray

The above photo is me as a brand new momma, with my 2-day old, first born daughter. She's giving me the exact expression that I'm thinking in my head. Those early days of life are so fragile, so dear to me. 

April is Donate Life month, and I'm delighted to have my friend, Kelly from Cloudy Day Gray here to share her story. Though I'm in full support of organ donation, I've never had to think about pediatric organ donation and the 1,900 children in the United States that await an organ right now. I'm joining in Kelly's efforts to show how we live and donate life every day with our children and families in hopes of spreading awareness about pediatric organ donation. Won't you join in by tagging your photos #HowIDonateLife?

Here's Kelly...

Before my daughter Matilda was born, I didn’t know anything about pediatric organ donation. I had never really considered the fact that children even experienced organ failure. And, I certainly had never considered the fact that the organ donors may need to be children themselves. These aren’t the things that parents want to think about.

That first week home with Matilda was full of the sweetest moments snuggling close, but it was also full of more worry, concerns, and self-doubt than I ever remembered having with my first. After three doctor visits, a late night trip to the ER, a transfer to a children's hospital, and the longest ambulance ride of my life to NYC, Matilda was diagnosed with acute liver failure, put on life support, and placed on the organ transplant waiting list.

I took Matilda's tiny hand in mine that night and whispered to her all my hopes and dreams. Our life took a dramatic shift, but I knew it was my job to learn, cherish every moment, and move forward with every breath - hand in hand.

The five long weeks we waited for an offer were the most challenging of my life. The endurance and pain of waiting was to be expected – I had my faith for that. But, there was so much more than just the wait. It was the separation from my son, the long nights at the hospital bedside, the alarms sounding constantly, the moments holding our breath when death was near. It was learning what everything meant – all the medical terms, the decisions, the side effects, and countless unknowns.

But, during that time my eyes were opened.

My priorities re-adjusted.

My goals broken down.

My heart opened.

I saw more kindness than I ever expected. I felt more strength than I knew existed within me. All of my emotions were amplified and for the first time, life felt simple. My goal each day was to show as much love to Matilda as possible - and that was enough.

Everything was being done medically to keep Matilda alive, but without a new liver we were urged to say goodbye. With lots of prayers and sweet lullabies, we made molds of her hands and feet, read her all of her brother's favorite stories, and promised to never give up hope. That very night, Matilda received an offer.

She received her liver transplant on her six-week birthday. While it was extremely risky due to her age and size, everything went smoothly. The surgeons were amazed that she was still alive because only 2% of her original liver was still functional. The gift from a two-week-old really was Matilda's only chance at life. A life full of joy, laughter, and zest.

This isn't the life I expected for my daughter, but it is the most beautiful life I have ever known.

Please join me as I gather 1,900 photos on Instagram to bring hope to the 1,900 children, just like Matilda, who are currently waiting for that same chance at life. Follow this link to learn more and get involved.

Three-Year Blogiversary + A Giveaway

Happy happy days are here!! Pars Caeli is a big three years old. By blog standards, Pars Caeli is an old gal now (9 months being the average lifespan of an active blog), and I can't help but reflect that she's just getting better with age.

As a way of thanking you beautiful people for joining along in any and every part of this journey, I have a fun giveaway of one of The Bannerie's glittery banners. In fact, I treated myself to a few banners that express in gold and glitter just how I'm feeling as we embark on another year of projects, collaborations, reflections, and musings. Here are my top three learnings as we embark on a new year!

We're only here once so let's love big! Boss babe banner by The Bannerie.

We're only here once so let's love big! Boss babe banner by The Bannerie.

1. LOVE BIG

I feel pretty strongly on this one in the whole vein of "shower the people you love with love" kind of way. And I love that this blog has given me the kind introduction to a ton of wonderful people. And I've been able to help them with their dreams, and they, in turn, have boosted my goals, too! I feel so fortunate to be able to shine big, bright spotlights on talented makers producing wonderful projects, great pieces of literature, and clever perspectives on the world.

I have a ton of projects that I want to accomplish, and I love that this space is one for me and for others, where we can throw love over all kinds of greatness.

I plan on loving bigger and better as we embark on this third year!

Sparkle messages from The Bannerie: Kind over Nice

Sparkle messages from The Bannerie: Kind over Nice

2. KIND OVER NICE

As much as I've loved highlighting and sharing others work, I've learned through collaborations that kindness always matters more than niceties. By that I mean, truly caring for the people with whom you work and genuinely looking to help them in real and powerful ways means so much more than the one off retweet or like here or there.

I'm always up for meeting new people, but I'm sure to keep supporting those whom I've known and trusted. As a "veteran" blogger, I want to help others through the meandering path of success but only in authentic and real ways. Far too many of us use the internet as a place where we are not ourselves, the comment or express emotions that are stronger than what we would deliver in person. And in year three, I'm up for making more kind connections and sincere gestures of support.

You got this. And you need a banner to remind you. Giveaway happening on Pars Caeli!

You got this. And you need a banner to remind you. Giveaway happening on Pars Caeli!

3. You got this

No, really, you do. I'm grateful that three years of blogging have brought me to here. I've got this. My own brand of fun, whimsy, crafty, mothering, project-making goodness. And you have your own list of comma-spaced awesomeness. And there is space, plenty of space, for both of us.

Pars Caeli has shown me that there are like minds all over the world, and now we have a venue for high fiving and patting each other on the back. And even kicking each other in the pants when necessary.

I want to give you one of The Bannerie's best selling banners with just this message! YOU GOT THIS! I have mine hanging in the studio right now. It's a super helpful mantra for those times when more than my fair share of doubt might creep in.

The Boss Babe banner giveaway is on until Sunday. And it's very easy to enter!! Pass the giveaway along to someone else as a fun gesture to show your love in big ways.

Thank you for joining in this journey and for celebrating the everyday kinds of wonderful that make life amazing. Can't wait to step into year three!

xoxo, MJ

Great Finds: Happy Handmade
Happy Handmade is a fantastic resource for any rainy/summer/snow day crafting with your children with 115 pages of fun projects made from materials you already have!

Happy Handmade is a fantastic resource for any rainy/summer/snow day crafting with your children with 115 pages of fun projects made from materials you already have!

Are you looking ahead to summer activities? What will the kids be up to this summer? I am busily planning away, both for my own spirit as well as the necessary planning for my kids' camp and other adventures. It's right about this time of year that we begin as a family talking about what each persons wants to do over the summer.

In the minds of a 10-, 7-, and 5-year old, summer can still feel very distant. Last year I created this printable as a conversation starter. We're a pleasant mix of introverts and extroverts so I wanted everyone to have some time to think in their own time about the weeks of possibility ahead.

Use this free printable to find out just what your kids WANT to do this summer. A great tool for a happy summer for all.

Use this free printable to find out just what your kids WANT to do this summer. A great tool for a happy summer for all.

As part of our Mommy and Daddy school every summer I'm really looking into diving head first into a new book from one of my favorite creative moms, Michelle of MollyMoo Crafts. A quick digital download with 115 pages of projects that are easy enough for me to love, and original enough for all my children to get excited.

Happy Handmade is a MollyMoo book, in collaboration with 17 international crafting moms. It is packed with happy and imaginative crafts. My very favorite aspect of all MollyMoo projects is that they cost next to nothing because they are made from recycled materials, cardboard or scraps of fabric and wool. I don't have to search craft and specialty stores to find exactly what I need; supplies are readily found in a busy household.

You can explore all these areas with beautiful photographic tutorials alongside:

  • Recycled Crafts
  • Paper and Cardboard Crafts
  • Felt and Sewing Projects
  • Handmade Toys
  • Pom Pom Crafts
  • Nature Crafts

I'm planning on making this awesome rocket with my little guy. I have a feeling he'll want to create his own fleet of spaceships once we get started.

Happy Handmade is a great resource to have around for any time! Download your copy of Happy Handmade here today!

Tell me, where do you turn when you're looking for productive and imaginative activities for your children?

xoxo, MJ

Make Your Own Stamps
You can use found objects to create fun stamps for any kind of project! Pin this one for later.

You can use found objects to create fun stamps for any kind of project! Pin this one for later.

Stamps are a great addition to every creative toolbox. They can be pricey to accumulate unless you're willing to explore some simple techniques for making your own unique stamps.

We love making our own wrapping paper and patterns using stamps - great expanses of open space along with total freedom of color and shape make for an easy recipe for success. Here are a few fun techniques to try with or without your kids:

Add foam circles to an empty tape roll for a fantastic polka dot effect.

Add foam circles to an empty tape roll for a fantastic polka dot effect.

Foam shapes make a great rubber stamp substitute. They won't last as long as the originals, but they offer a quick solution with super results. We used an empty tape roll and added foam circles of varying sizes for a polka dot pattern. You can carefully roll the tube down the paper or wear it on your arm for a fast tread of dots (a favorite with my crew).

Add foam stars to a ball for a fun rolling stamp activity.

Add foam stars to a ball for a fun rolling stamp activity.

For the smallest hands, we added some star shapes to a ball that can be rolled around for patterns and stripes. Rolling in ink is all kinds of messy fun!

For the more detailed oriented, grab a basic pink eraser or a stamp compound, and trace a design for your stamp. We transferred a simple ladybug image onto the stamp using tracing paper and a pencil.

With a carving tool, remove the part of the image that you do not want stamped. The ink will only adhere to the shapes that remain. Press your new stamp into an ink pad and repeat in random or ordered patterns! Enjoy the imperfections that come as you continue the process.

We love creating our own stamps! Have you ever tried it?

xoxo, MJ

How to Start a Shop: A Totally Useful Interview with Four Entrepreneurs
Ever thought of starting your own shop? Read this first - advice from four amazing entrepreneurs.

Ever thought of starting your own shop? Read this first - advice from four amazing entrepreneurs.

Have you ever thought of selling your creations? Maybe having your own store? I am excited and delighted to try it for myself, and I'm a strong believer that in starting a new journey you need to talk to those who have gone before you.

And so I asked four of my favorites over for a virtual coffee.  Meet Lacy, founder of Madre Beads, a hot new boutique with non-toxic wooden jewelry for kids and women. And Kim, creator of Design Life Kids, a fast-growing treasure trove of hip and hot fashions for your home, your children, and yourself.  Meet Emily, painter and creator of Emily Jeffords Studios, a beautiful escape from the mundane where you can find original paintings, prints, and creative consultations. And finally, Gilit of The Bannerie, maker of glittery, fun-filled messages for all your celebrations.

1. What prompted you to open a shop?

I love the wide variety of inspiration in these answers! Where would you find yourself?

GILIT:

Sometimes everyone around you sees something about you before you do.

In this case I had been told for years that I should sell my stuff and start a business, but how intimidating does that sound? In the months before I started, my daughter was home with me, and the jobs I was looking for needed someone to work nights and weekends. I wasn't willing to do that anymore. I needed a job, I have a strong drive to create, and I've always dreamed of having my own shop. So I did it.

LACY:

As a mom of three, I was continually frustrated with the jewelry options for mothers. Nearly all of the jewelry I had wasn't baby-friendly. Sharp metal certainly didn't belong in in my baby's mouth, and everything else I had hurt my neck when she pulled and yanked at it. I started playing around with some designs and did a bunch of research to find the best baby-friendly beads and finally came up with a concept I loved. Now, I make playful jewelry that moms can wear with the comfort of knowing their babes can enjoy pulling, tugging, sucking and chewing on it, too.

See more beautiful artwork at EmilyJeffords.com

See more beautiful artwork at EmilyJeffords.com

EMILY:

I opened my Etsy shop right after my college first art show.  I had a nice body of work built up from my college days and needed a place to document, share, and send it off into the world.  

KIM:

I wanted to fulfill a dream after the loss of my husband.

I wanted to set an example for my girls to make the best of this life we have and not be afraid to go after your dreams no matter how hard they seem and how much work it might entail.
Find the hip and the modern over at Design Life Kids.

Find the hip and the modern over at Design Life Kids.

2. How long has the shop been open? What did you sell initially?

LACY:

My shop has only been opened for less than a month!

GILIT:

It's going to be a year! Initially I was ALL over the place with every banner that I ever made and with anything that anyone asked me for even when I didn't want to make it. I always felt it wasn't the right move, but it took time for me to figure out what was the right move, which was to brand and focus.

KIM:

I opened DLK on October 1, 2014. I focused mostly on children's clothing and a few toys but have expanded into a fun collection of modern housewares and decor!

Fresh messages in all that glitters are the specialty of The Bannerie.

Fresh messages in all that glitters are the specialty of The Bannerie.

3. How did you get the word out about your shop?

EMILY:

After my first baby was born, I was a stay-at-home mom, loving every moment, but I felt that I needed a challenge. I decided that I would create a painting-a-day and sell the paintings in my Etsy shop! Back then, Etsy was a much smaller place. I also blogged every day, showing my work to my natural market and reaching a few new people. This circle grew and became something small, but very supportive.  

LACY:

I began spreading the word about Madre Beads on Instagram. For the first few months, I gave sneak peeks that I hoped would lure customers in. I think the anticipation really got people excited!

Find fabulous wooden beads like these at Lacy's new store, Madre Beads.

Find fabulous wooden beads like these at Lacy's new store, Madre Beads.

GILIT:

Definitely though my blog and Instagram. That plus Pinterest are my biggest referrers,

Free social media is a small business owner's best friend!

KIM:

Instagram was my support system and has become my best way to reach customers. Having a consistent aesthetic and being authentic has always been important to me there.


5. What's the best advice you can give to entrepreneurs considering starting a shop?

KIM:

Start small with inventory. It's better to sell out than it is to sit on it. And breathe... being an entrepreneur really requires passion and dedication, but it's really an awesome experience if you can keep it fun.

EMILY:

The best advice I was given as a young artist, counting every single penny: Invest in photography.  You can do it yourself, and you can totally DIY good styling, but invest time and thought in the execution and money in a good camera.  Photography sells online. 

Give your work the credit it deserves! 

LACY:

Plan way in advance and do your absolute best. I have started other small business before, on a whim, with no plan or purpose in site. As you can imagine, those businesses didn't do so hot. With Madre Beads, I took my time. I did research. I learned from my mistakes. I got feedback from friends. I made surveys and asked questions. I worked hard to develop my brand, even before I began making all of my products. I'm always putting myself in the customer's shoes.

"If I saw this photo, would I like it?" "Would I buy this?" Would I pin this?" "Would I give this as a gift?"

GILIT:

JUST DO IT! It's so easy to get caught in the planning and research stage, but go for it! You don't even need to publicize it right away. Take your time, get it set up, and slowly start spreading the word. The more you do it, the more confident you will feel (hopefully!)

Also, be prepared to work hard. It's not like being your own boss means you get to stop and have coffee whenever you want, it means you are in charge of EVERYTHING.

Even if it feels like you don't have a minute to breathe, or you won't be at your best, remember that you have to take care of yourself first and foremost.


Thanks so much, Lacy, Emily, Kim, and Gilit!! I loved hearing the origins of some of my favorite shops.

What advice would you offer?

xoxo, MJ


5 Fresh Takes on Easter Eggs
If you're looking for eggs that are out of the ordinary, I've got five great ideas from talented folks around the web.

If you're looking for eggs that are out of the ordinary, I've got five great ideas from talented folks around the web.

Do you dye eggs or decorate them at all? Have you dyed Easter eggs yet? We always leave this activity for the end of Holy Week, Friday through Sunday, when we're all together with a little more time together to create.

Usually I fall in love with saturated pastels or marbleized wonders for Easter egg creations. I always leave one white egg that I make into a bunny with ears added on. But this year, I've been inspired by all of the creative eggs I've seen! I've rounded up my five favorites (and there are a ton out there, including more on our Easter board).

1. Bunnies and friends: If you still want all the cute in your eggs, check out Confetti Sunshine's adorable post on making these sweet versions of the traditional. I love the minimal expression on them to bring out a modern feel!

2. Fruits & Veggies: Little Inspiration created bright designs that could come fresh from the market. I love the way she transformed these into something else entirely! So fun.

3. Emoji: Studio DIY is the creative spot for celebrations, and Kelly outdid herself with these eggs of expression. I love the idea of sending messages to family members with a plate of emoji eggs! They don't have to be real...

4. Modern patterns: Erin of Earnest Home Co. made these beautifully patterned eggs that make me want Easter to go on and on. Her aesthetic is always clean and modern, and I love how she

5. Great Art: These are too punny. Jen of Classic Play made four great artists as eggs! And, of course, there are free printables that coordinate. Freida Kahlo as an egg is ah-mazing! Fun, educational, and totally unique.

What's your technique this year? I'm always looking for fresh takes on traditions.

xoxo, MJ

P.S. If you're looking for a great list of sugar-free goodies to add to Easter baskets, Handmade Mood has a fab round up.

P.P.S. Mommy Coddle has the cutest wooden bead bunny necklace that would make a great afternoon project to keep everyone busy for the Easter weekend!


The Good Stuff Jar: Parenting Ideas
My kids know when I reprimand them that they've done something wrong. But do they know how much good they do? Use a good stuff jar to bring the best out in your family.

My kids know when I reprimand them that they've done something wrong. But do they know how much good they do? Use a good stuff jar to bring the best out in your family.

Parenting is tough stuff. No surprise there.

"Stop teasing your sister."

"Get away from your brother. Can't you two just spend some time apart?"

"Would you please pick up your dirty clothes? All of them."

Dialogue, or I suppose more like monologue, like this happens all the time in our house. As a mom, I feel like it's my job to prevent battles, to maintain some kind of order, and to foster loving relationships. We express a lot of emotions in our house, and I try earnestly to say and to show my children how much I love them.

But.

There are still those times. The witching hours, the frayed nerves, the tight schedules, the incessant teasing. And my parenting focus becomes more "do no harm" rather than "love real big."

One night, after a particularly taxing parenting day, I noticed my daughter, crying softly on her bed (she is typically a dramatic crier, so I knew something was really bothering her). I took a deep breath and went over to sit next to her. "Mommy, I've done so many things wrong today. I don't know what I'm going to do." And in her sincere, seven-year old angst, she looked down with a sigh.

Oh, man. I glanced over at her soft, little hands, and I replayed my commentary to her throughout the day. I had declared nearly a chapter's worth of to do's, reminders, reprimands, declarations, insistences, and warnings.

My kids know when I reprimand them that they've done something wrong. But do they know how much good they do? Use a good stuff jar to bring the best out in your family.

My kids know when I reprimand them that they've done something wrong. But do they know how much good they do? Use a good stuff jar to bring the best out in your family.

But, that's not what hit me (thank God) at that moment. My daughter had done SO many good things that day - from speaking gently to her little brother who needed some assistance with his drawing, to setting the table without being asked, to singing and dancing throughout the house and lightening our moods, to asking her sister how her day was.

Blech. She had forgotten all of that and now felt reduced to her actions that I corrected.

That's not the kind of parent I want to be. That's not the kind of human I want to be.

Because for every mistake or failing, there are at least double if not triple the amount of goodnesses occurring every single day.

Even the rough ones.

I counted.

So working from a very concrete level, where we sometimes need to with ourselves and young children, I developed the Good Stuff jar. It sits right by our front door, near our only staircase, right in the center of our home. My three kids fill it with their goodness. By this I mean, every time they see one another or we see them spreading goodness, they put in a gem (our name for the colorful glass beads). Once the jar is full, we all get to decide on how we want to use this goodness - special time together? something special for someone we know? something for our home?

And I've loved that they are seeing just how GOOD they are.

A few things about the Good Stuff jar:

  • It's not a behavior system. It has not eliminated poor choices or bad behavior in our family. It wasn't intended to do so.
  • It's used only to show goodness. We don't take beads out when the teasing starts up or the hitting ensues. The Good Stuff jar is not a score-keeping tool.
  • It's an all-for-one system...so that when the 5-year old is kind, we all benefit (because we really do), and if he does great things ten times today and the 10-year old is in a mood and feeling like she needs her time away, than it's all good. No one "wins" for having the most gems in the jar.
  • The celebration for a full jar of goodness is decided as a family and enjoyed as a family.

But it has made all of us (me included) aware of all the many, many ways children are sweet, humble, generous, and delightful. I need to remember that and celebrate that. And I want my children to see it in themselves and all the other people they encounter.

Because that's just the kind of parent I want to be. And that's exactly the kind of human I want to be.

Would you consider a Good Stuff jar at your house?

xoxo, MJ


Just Because Cake
Some days deserve cake - make these Just Because cakes! Using cans you can create a multi-layer mini cake that celebrate any (and every) occasion.

Some days deserve cake - make these Just Because cakes! Using cans you can create a multi-layer mini cake that celebrate any (and every) occasion.

Hooray! Celebrate! I'm so excited. Happy Cakentine's Day!!

Wait, what? You may need to Google this one. You've never heard of Cakentine's Day?

PC_cakentines.jpg

That's likely because we made it up.

Cakentine's Day began when Melissa of Lulu the Baker wished me a happy Valentine's day, and Instagram autocorrected to Cakentine's. Melissa is all kinds of talented so I figured she had the inside scoop on a new holiday, and I began Googling. PJ (A Girl Named PJ) quickly noticed the new word, and ridiculous banter back and forth followed until we decided that we would go ahead and celebrate Cakentine's Day.

Melissa created a gorgeous Everyday Citrus Cake (which means we can eat it everyday, right?), and PJ has an amazing tutorial on how to frost a cake like a pro.

The taste of spring and summer come together in this scrumptious Everyday Citrus Cake by Lulu the Baker.

The taste of spring and summer come together in this scrumptious Everyday Citrus Cake by Lulu the Baker.

Step by step instruction on how to frost a cake like a pro with A Girl Named PJ.

Step by step instruction on how to frost a cake like a pro with A Girl Named PJ.

I'm home today with my daughter, sick with strep, so we created these Just Because cakes. I think we'll BOTH be needing them by day's end . . . just because. They are perfect for any and every occasion or no occasion at all.

Every since I saw Jordan's post on mini cakes back in 2012, I've wondered what baking in cans would look like. I love the idea of a cake just for you so I thought we'd give it a try. Turns out it's really easy. Like silly easy.

For our Just Because cakes, we used our favorite boxed mix and frosting. If I'm going to whip up a cake just because, it needs to be easy and fun to no original recipes on this one.

One box can make three mini cakes.

1. Rinse and clean three cans well. I used cans that once held our beloved mandarin oranges.


2. Create cake mix according to recipe. Be sure to grease/flour. Ladel batter into cans until they are slight more than halfway full.

3. Place in oven and bake. Our recipe called for 40 minutes at 325. I wasn't sure how to time the final baking so I began checking the cakes at 30 minutes. As you can see in the photo above, they bubbled over a bit.

4. Using a wet knife (a great tip from Jordan that I never knew), carefully loosen the cake from the can all the way around the perimeter. Go ahead and make the circle around the can a few times to ensure that the cake lifts off the can easily. Shimmy, shake, and encourage that cake out of the can. This may take a bit of patience.

Use a can to shape a unique and fun way to serve cake! Super simple.

Use a can to shape a unique and fun way to serve cake! Super simple.

5. Once removed, cut the rounded top off of the cake. And then cut in half and then half again for four round slices/layers of cake.

6. Carefully frost each layer. I recommend piping it on and then using the wet knife to spread. No need to be fancy here, I used a Ziploc bag with the corner end snipped off as my pastry bag.

Happy toppers on these Just Because cake let you know you're loved. Use a skewer to poke all the way through the layers and add stability.

Happy toppers on these Just Because cake let you know you're loved. Use a skewer to poke all the way through the layers and add stability.

7. Add a happy flag on a skewer, poked through the layers, will add stability and smiles.

Happy baking and caking on this first annual Cakenstine's Day!! Enjoy a laugh with friends on us.

xoxo, MJ

5 Ways to DIY: Wood Trays

It's a great week, friends! We're kicking it off with a fun new series. I'm teaming up with four makers to show you how to DIY the same object five different ways. And we want to see how you'd create one, too, through a fantastic giveaway!

Here's our team:

  • Laurel from A Bubbly Life always brings the party with her, and it was her crafty mind that brought all of us together. She did a great wood burned love message on her tray, and I'm itching to give wood burning a try. Have you ever done it?
  • Sarah of Sarah Hearts put together a signature polka dot tray that bursts with cheer. Sarah's projects are always filled with color and vibrancy. Click over to see how she created her tray (and check out her studio door that coordinates oh so nicely).
  • Jeran from Oleander and Palm chose a rich stain to color her tray and then she added a modern touch with her handles and triangle design. Her styling is global and sleek and kind of transformative for a simple wood tray.
  • Rachel of The Crafted Life covered her tray in vibrant fabric. In her style, she made a big impact with process that we can all give a try! I love how she makes the most beautiful projects approachable and awesome.
PC_5waystoDIY_woodtray.jpg

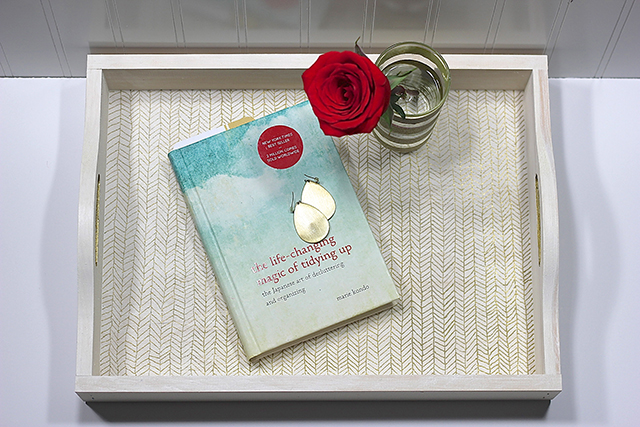
For my wood tray, I wanted something white and patterned. The final product is a white washed, hand-drawn patterned bedside tray. The process is foolproof (perfect for me) and quick to complete.

All you need is a small can of whitewash stain and an oil-based gold marker. I used a fine tip gold Sharpie. Paint the entire tray with the whitewash. Let it dry overnight and add a second coat.

Create an easy patterned tray with oil-based permanent markers and this simple geometric design. #5waystoDIY

Create an easy patterned tray with oil-based permanent markers and this simple geometric design. #5waystoDIY

Once the second coat is dry, you can begin drawing on the tray. For this pattern, I drew the vertical lines first and then quickly added in the diagonals. Don't fuss too much with perfection and let yourself just doodle and enjoy the repetitive motion back and forth. Hand-drawn patterns have become a favorite of mine, and they're totally on trend right now!

Paint markers can add a gilded finish to a simple wood tray. #5waystoDIY

Paint markers can add a gilded finish to a simple wood tray. #5waystoDIY

To finish off the tray, I painted the interior of the handles with the gold Sharpie and called it complete. I love working with the fine tip paint marker, the flow is consistent and precise, and the shimmer of the gold is just enough.

Be sure to click on through all the ways to recreate a wood tray, AND enter below to make your own. I'll be teaming up again with these great ladies (Luck-y me!!!) for another #5WaystoDIY so look for the hashtag and let us know what we should take on next!

And thanks for joining in the fun!!

xoxo, MJ


8 Ways to Bring Spring into Your Home today
Spring is here, but it might not look or feel like it where you are. 8 easy ways to bring spring into your home today!

Spring is here, but it might not look or feel like it where you are. 8 easy ways to bring spring into your home today!

The snow has melted, and our house is surrounded by a lovely lawn of brown grass and bare branches. Spring is here, but it seems that winter is still trying to steal the show. I find myself looking for green buds and soft breezes that are not yet ready to arrive. Here are 8 simple ways to bring spring into your life:

1. Plant some Easter grass

The fun of seeing grass grow in the middle of your living space is such a thrill! Yes, I just admitted that I enjoy watching grass grow. For us it's going to be many months before our lawn can provide the green lush feel. And with wheat grass, you can quickly see the natural process develop over a period of days. Your grocery or bulk store likely has the seed, and any bright or unexpected container will add to the fun!

2. Add colorful touches to your interior

Now is the perfect time to prep your spaces for spring with burst of color in pillows, throws, tablecloths, and more! You might even feel ready to make something beautiful like these yarn art pieces from Oleander and Palm. I love these flower votives from This Heart of Mine to make any meal feel like a special garden party.

3. Fill your home with favorite natural scents

Hyancinths say "you've made it through another winter" to me! And I adore them for it. I pick one up from the store this time of year to add that irresistible scent to our space. I'm also really excited about lavender and citrus aromas so I often keep some on simmer while we're working and playing around the kitchen. It's a simple way that I convince my brain that spring freshness is here.

Bring the glam to Easter eggs with some silver leafing! Way easier than you think it might be.

Bring the glam to Easter eggs with some silver leafing! Way easier than you think it might be.

4. Get outside

Even if it's still cold or snowy or gray or drizzly (or any of the other excuses I provide) put on your coat and gloves and get outside. The ground is getting softer, the birds are tuning their voices, and the smells are changing. My children know I love the aroma of fresh, brown dirt, and in turn

5. Add color back into your wardrobe

Sometimes winter inspires (!) me to wear a lot of gray, accented with brown or black. I know, not the most interesting look. Come March, I'm ready to break out the floral head scarves, brightly colored flats, and prints that contain more than one tone. If the blooms are quite ready to break ground yet, go ahead and coax them out with your own shades of awesome. Joy's selections for spring are right up my alley, and I'm going to try my hand at some color blocking nails, too!

Bring the glam to Easter eggs with some silver leafing! Way easier than you think it might be.

Bring the glam to Easter eggs with some silver leafing! Way easier than you think it might be.

6. Force some flowering branches

This is one you can do even as the frost is around. Spring bouquets filled with branches of wisteria, dogwood, and more are a gift of early spring. Steph has some wonderful tips on how and when to cut these so that you get the most flowering for interior spaces.

7. Change up your station

It's a great time to change up your playlist and pop on the tunes that make you feel lighter, happier, and give you an extra kick to your step. Pretty soon we'll be in the heat of summer, windows down and music blaring. But for now, we welcome in spring with optimistic flavor and music!

8. Make silver leafed eggs

Here's what we're up to right now to bring spring to our home - silver leafing eggs! I love the effect of leafing - whether it's gold, silver, or copper - and Easter eggs go to the next level when wearing a little extra bling. I used a bag of artificial colored eggs from the craft store, some leafing medium (an adhesive ready for the job), and the silver leafing. The metal comes in super thin sheets and is ultra delicate so if you want to apply a lot of leafing, be sure to use tweezers to tear your sheets. I wanted the leafing to allow color to peak in and out of the surface tones so I applied the adhesive in random wiggly patterns. Using my fingers, I patted one inch sections on to the egg and carefully removed excess along the way. Once all the leafing was applied, I went back with the adhesive to make sure edges were smoothed down. These eggs glisten all on their own!

Are you as ready for spring as I am? How do you change over to the new season in yoru home?

xoxo, MJ

DIY Bunny Pom Pom Garland
DIY Bunny Pom Pom Garland. Quick craft for Easter, to do with or without the kids!

DIY Bunny Pom Pom Garland. Quick craft for Easter, to do with or without the kids!

Hippity, hoppity Easter's on its way. Yesterday was our first real taste of spring with temperatures reaching into the 70s. Glorious. And I have spring fever. Bring on the bunny crafts! This week is packed with the first posts of spring - super easy ways to take your space into the next holiday season.

White paper, the medium of my childhood, is full of so much potential! I've used it for crafts that I love like our current color blocked wreath and our daffodil wreath (that I hang all year in our guest room), and now I'm back to it with Easter bunnies.

Pom poms make the cutest bunny tails. Make a bunny garland for Easter to add to your mantle or holiday celebration!

Pom poms make the cutest bunny tails. Make a bunny garland for Easter to add to your mantle or holiday celebration!

To make the string of bunnies, I used our roll of white paper (from IKEA) so that I could extend the length to as long as I wanted. Fold the paper back and forth, accordion-style and trace out the half of your bunny. If you want to use the same pattern, you can download my template here.

Add a bunny garland to a special Easter gift! Who needs ribbon?

Add a bunny garland to a special Easter gift! Who needs ribbon?

Unfold and flatten the chain of bunnies. Add on pom poms with glue. These garlands make a colorful addition to any and every space! And we love how they look as a present topper to a special Easter present.

Folded paper and some pom poms! Peter Cottontail made modern.

Folded paper and some pom poms! Peter Cottontail made modern.

The Bunny Pom Pom Garlands could make a great starting line for your eager Easter egg hunt participants. Or make them extra small and transform them into a spring cake topper! Cut out just one to finish off a cupcake.

Bunnies are the new paper dolls! An easy way to bring the Easter season to your home. And the pom poms!!

Bunnies are the new paper dolls! An easy way to bring the Easter season to your home. And the pom poms!!

Happy crafting, friends!

xoxo, MJ

Printable Thank You Cards

This post is sponsored by Munchkin. Ideas and musings all from me. Thanks for supporting our sponsors.

A good party deserves great gestures of gratitude! And the rockstar of the show, Miss Amy Christie of This Heart of Mine has outdone herself.  Jen, Melissa, Ali, and I and the good people at Munchkin have loved showering on the goodies this week. Jen kicked it off with gorgeous welcome ribbon chandelier DIY, and Melissa brought the ultimate buffet with gourmet PB & J bar,  and we tossed around some multi-use table decor using colorful baby gear.

And now we have these sweet printable (free!) thank you notes from Amy! She's created them in three different palettes so they're good for any occasion.

She also has a photo of her little pipsqueak that you have to check out. So so sweet!

xoxo, MJ


Munchkin rids the world of the mundane by developing clever, innovative solutions that make family life safe, easier, and more fun. You can find their products at Munchkin.com, Target, Babies’R’Us, Walmart, and Amazon. It’s the little things!

Welcome Baby Party Decorations

This post is sponsored by Munchkin. Ideas and musings all from me. Thanks for supporting our sponsors.

Throwing a baby shower or a party for a new mom? Use toys and gear as a part of the decorations for a bright surprise that a new mom can put right to use!

Throwing a baby shower or a party for a new mom? Use toys and gear as a part of the decorations for a bright surprise that a new mom can put right to use!

All this week we're Celebrating the Little Things in a fabulous party for new mom, Amy Christie, creator of This Heart of Mine. Amy is so talented and funny (what a whit!), and a fabulous mom of three now. Even more than a baby shower, we wanted to say congratulations momma on a job well done!! Let's celebrate life.

Jen decked out the present table with the sweetest ribbon chandelier where visitors and guests can leave their well wishes for the new baby. Melissa prepared a gourmet PB&J buffet that is positively amazing (I'm a huge peanut butter and jelly fan).

I'm bringing the party supplies! I was inspired by the cool gadgets and toys of Munchkin to make our own decor from items that Amy can use long after the party ends.

Add vinyl letters to basic balloons to say exactly what you want. Love these colors.

Add vinyl letters to basic balloons to say exactly what you want. Love these colors.

I love adding simple white letters (stickers or vinyl) to plain balloons! To hold the balloons in place, I put simple glasses on top of the string and added colorful yarn pom poms.

The kids can get involved in party prep with simple garlands like the one below. My kids created these for the party in a few minutes from some white thread and cut colored paper. These act like mobiles and add movement and playfulness.

Get the siblings involved in making the party! These simple banners are made from paper rectangles taped onto white thread. Color infusion!!

Get the siblings involved in making the party! These simple banners are made from paper rectangles taped onto white thread. Color infusion!!

Grippy dots for the tub or coasters that stay right where you want them? I loved putting these out for a fun table runner down the table. My children have also loved pretending with the grippy dots - they been pancakes at our imaginary pancake food truck (what a great idea, huh?) and a masterful indoor hopscotch pattern in the hallway.

Bath letters were calling my name for a special message. Amy's children have given her newborn the nickname, Pipsqueak. So cute! Using some floral wire, I attached these bathtub letters together to shower on the love. The wire leaves only small holes in the sides of the letters, and they're ready to be used in big sister's or big brother's bath.

Grippy dots for the tub turn into table runners and coasters. Letters for the bath tub become the special messages you want to send!

Grippy dots for the tub turn into table runners and coasters. Letters for the bath tub become the special messages you want to send!

Decorating the tables, the Miracle Cups decked out in dots! We are big fans of these cups that don't spill and can be used from any side. They are the hippest water bottles for my 7- and 10-year olds in their bright shades. For the party, we removed the lid, and slid in a glass to hold the flowers and keep the sippy clean. The dots were added for the party but can be easily removed for washing and further use!

Add dot stickers or vinyl circles to these bright cups and they become fun floral centerpieces.

Add dot stickers or vinyl circles to these bright cups and they become fun floral centerpieces.

We're over on Munchkin's Instagram feed this week, too, showing how we cherish the little things in our lives and celebrate parenthood! Stop on over and say hi.

Congratulations Amy on Pipsqueak's arrival! We love him already.

xoxo, MJ


Munchkin rids the world of the mundane by developing clever, innovative solutions that make family life safe, easier, and more fun. You can find their products at Munchkin.com, Target, Babies’R’Us, Walmart, and Amazon. It’s the little things!

Gourmet PB & J Bar

This post is sponsored by Munchkin. Ideas and musings all from me. Thanks for supporting our sponsors.

Such a fun buffet for a baby shower! Lulu the Baker knows how to dress up peanut butter and jelly.

Such a fun buffet for a baby shower! Lulu the Baker knows how to dress up peanut butter and jelly.

I like mine with butter, peanut butter, raspberry jelly, and raisins. Many of us grew up on peanut butter and jelly, and I for one still love it! That's why I was so excited to hear that Melissa was making us a gourmet PB & J buffet for Amy's Celebrate the Little Things party.

I might have to change my mind about my favorite combinations! Take a look at some of her choices of breads, spreads, and drinks. I can't resist the signs and banners either. She paired some cute and colorful Munchkin plates to take us all back to our childhoods.

Head on over to Lulu the Baker to see all the details! I'll be adding to the party tomorrow with some party decor that will delight moms and kids alike.

Munchkin rids the world of the mundane by developing clever, innovative solutions that make family life safe, easier, and more fun. You can find their products at Munchkin.comTargetBabies’R’UsWalmart, and Amazon. It’s the little things!

Celebrate the Little Things: Party for a New Mom

This post is sponsored by Munchkin. Ideas and musings all from me. Thanks for supporting our sponsors.

Send all your wishes for a new mom on this fun ribbon chandelier! Beautiful just about anywhere.

Send all your wishes for a new mom on this fun ribbon chandelier! Beautiful just about anywhere.

There's a new babe in town! My friend, Amy Christie, gave birth to her beautiful pipsqueak last week, and he is the cutest (go check him out).

Amy is now a momma of three, like moi, and although a baby shower is awesome to restock and to resupply the necessities, we wanted to celebrate her and all the little things that make becoming a momma again so special.

Join me and some amazing ladies with a week of celebrations and easy gifts you can give a new momma. We'll be posting on our blogs as well as taking over the Munchkin Instagram accounts. Come join in the fun!!

Jen is kicking off the party today with a Welcome Ribbon Chandelier. So bright and bold! If you're having a party, hang it over the gift table. It’s suuuuuper easy, and I think it's a fabulous idea for any kind of celebration. Each guest or visitor writes a sweet little note to the mama, papa and/or baby to pin to the ribbons that they can save for their scrapbook later.

Send all your wishes for a new mom on this fun ribbon chandelier! Beautiful just about anywhere.

Send all your wishes for a new mom on this fun ribbon chandelier! Beautiful just about anywhere.

Melissa of Lulu the Baker is bringing an amazing spread tomorrow! Can't wait to show you.

xoxo, MJ

Munchkin rids the world of the mundane by developing clever, innovative solutions that make family life safe, easier, and more fun. You can find their products at Munchkin.com, Target, Babies’R’Us, Walmart, and Amazon. It’s the little things!
Color blocked spring wreath
A wreath to take your home from winter to spring made from paper leaves!

A wreath to take your home from winter to spring made from paper leaves!

Who says that St. Patrick's Day has to be all kelly green and rainbows? I've been endlessly inspired by a pack of gold cardstock I received. We've created four-leaf clovers, leprechaun treat boxes, and now this color blocked wreath for the season!

Our front door is currently green so I didn't want to create something for March that would clash with the tones of our house. What to do? Go gold. But all gold was a little more Vegas than I wanted. I cut out (using my Cricut Explore) about 40 gold leaves. I folded them down the middle to mimic the veining of a real leaf. As I was playing around with the folds, I found myself liking how the front and back of the paper looked together, the shine of the gold against the matte of the white.

A wreath to take your home from winter to spring made from paper leaves!

A wreath to take your home from winter to spring made from paper leaves!

I used a wire hanger, my go to for wreath making, and bent it into a circle. I clumped the leaves into two and threes with glue, trying to keep their folded nature for dimensional quality.

A wreath to take your home from winter to spring made from paper leaves!

A wreath to take your home from winter to spring made from paper leaves!

And now we're set for the pots of gold that the leprechaun might leave us as well as the first blossoms of spring.

I can't believe that gold has won me over! I used to be such a platinum/silver kind of girl. Do you find yourself attracted to one metallic over another?

xoxo, MJ

17 Leprechaun Pranks for St. Patrick's Day
If a leprechaun visits your house on St. Patrick's Day, here are 17 silly tricks he might leave in his path!

If a leprechaun visits your house on St. Patrick's Day, here are 17 silly tricks he might leave in his path!

For the last several years, we've had a peculiar visitor to our house on the eve of St. Patrick's Day. A tiny leprechaun pranks us with his mischief but always leaves a few treats behind for good luck.

As a young mom, I knew that we'd have visits from Santa and the Easter Bunny and the Tooth Fairy. But I was surprised when my kindergartener's classroom was turned upside down from a leprechaun! She had worked with her classmates to create traps from recycled materials to catch the little guy. They came up empty handed.

Don't make the mistake I made of thinking the leprechaun only visits schools! If the leprechaun needs to make a visit to your home, here are 17 pranks he might play:

1. Turning the toilet water green. This one seems to happen a lot and always brings on a bad case of the giggles.

2. Making plants and bushes bloom marshmallows. You'll see he often borrows from April Fool's Day pranks. :) Take a look at Jodi's idea over at Meaningful Mama.

Leprechauns have the power to make plants and bushes bloom marshmallows... because why not?

Leprechauns have the power to make plants and bushes bloom marshmallows... because why not?

3. Turning furniture upside down. We've seen this one on a smaller scale with dining and desk chairs but some leprechauns go big and turn over couches or shelves.

4. Leaving various objects in the shape of a shamrock. We've had all of our shoes arranged in a big clover, but also watch out for utensils, straws, crayons, and more.

5. Adding googly eyes to everything on your child's breakfast plate/bowl. This meal is really well done.

6. Sometimes leprechauns leave behind green droppings.

Leprechauns leave the smallest of notes like these from A Bit of Bees Knees

Leprechauns leave the smallest of notes like these from A Bit of Bees Knees

7. Messaging on the smallest of papers.

8. Turning the milk for cereal green.

9. Rainbows are a go-to for leprechauns. We've had some colorful fruit plates, and this jello would be perfect, too.

10. Beware, they often leave a lot of these green footprints around your house.

11. Replacing light bulbs with green bulbs so that the early morning action of turning on the lights feels totally different.

12. Writing taunting messages on chalkboards, whiteboards, or right on your floor.


13. Crafting these adorable leprechaun images with your photos and paper plates.

14. Rocking the party with a bucket of these golden nuggets that might be more like painted rocks.

15. Planting this rainbow scavenger hunt all over your house. These free and fantastic printables might make your want to do this all year round.

16. Gifting with these special golden treat boxes filled with favorite rainbow candy.

17. The best leprechauns leave behind a bit of their treasure, and we always have a share of the pot of gold hidden somewhere in our house. Chocolate gold coins for everyone!

Hoping you've kissed a bit of the blarney stone this year, and you receive some of these silly pranks at your house! Happy St. Patrick's Day.

xoxo, MJ