This post is sponsored by Munchkin. Ideas and musings all from me. Thanks for supporting our sponsors.
Throwing a baby shower or a party for a new mom? Use toys and gear as a part of the decorations for a bright surprise that a new mom can put right to use!
All this week we're Celebrating the Little Things in a fabulous party for new mom, Amy Christie, creator of This Heart of Mine. Amy is so talented and funny (what a whit!), and a fabulous mom of three now. Even more than a baby shower, we wanted to say congratulations momma on a job well done!! Let's celebrate life.
Jen decked out the present table with the sweetest ribbon chandelier where visitors and guests can leave their well wishes for the new baby. Melissa prepared a gourmet PB&J buffet that is positively amazing (I'm a huge peanut butter and jelly fan).
I'm bringing the party supplies! I was inspired by the cool gadgets and toys of Munchkin to make our own decor from items that Amy can use long after the party ends.

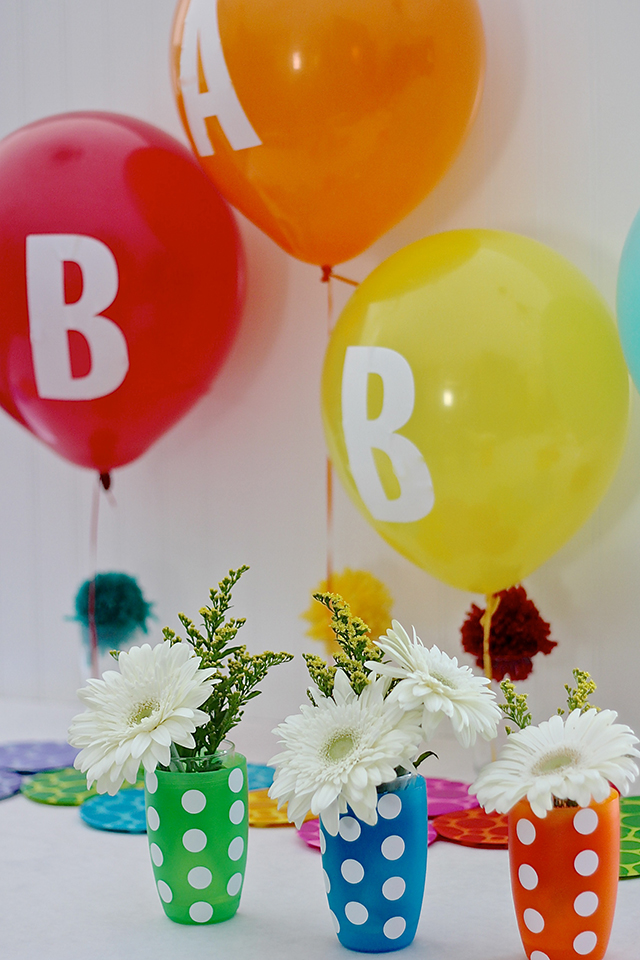
Add vinyl letters to basic balloons to say exactly what you want. Love these colors.
I love adding simple white letters (stickers or vinyl) to plain balloons! To hold the balloons in place, I put simple glasses on top of the string and added colorful yarn pom poms.
The kids can get involved in party prep with simple garlands like the one below. My kids created these for the party in a few minutes from some white thread and cut colored paper. These act like mobiles and add movement and playfulness.

Get the siblings involved in making the party! These simple banners are made from paper rectangles taped onto white thread. Color infusion!!
Grippy dots for the tub or coasters that stay right where you want them? I loved putting these out for a fun table runner down the table. My children have also loved pretending with the grippy dots - they been pancakes at our imaginary pancake food truck (what a great idea, huh?) and a masterful indoor hopscotch pattern in the hallway.
Bath letters were calling my name for a special message. Amy's children have given her newborn the nickname, Pipsqueak. So cute! Using some floral wire, I attached these bathtub letters together to shower on the love. The wire leaves only small holes in the sides of the letters, and they're ready to be used in big sister's or big brother's bath.

Grippy dots for the tub turn into table runners and coasters. Letters for the bath tub become the special messages you want to send!
Decorating the tables, the Miracle Cups decked out in dots! We are big fans of these cups that don't spill and can be used from any side. They are the hippest water bottles for my 7- and 10-year olds in their bright shades. For the party, we removed the lid, and slid in a glass to hold the flowers and keep the sippy clean. The dots were added for the party but can be easily removed for washing and further use!

Add dot stickers or vinyl circles to these bright cups and they become fun floral centerpieces.
We're over on Munchkin's Instagram feed this week, too, showing how we cherish the little things in our lives and celebrate parenthood! Stop on over and say hi.
Congratulations Amy on Pipsqueak's arrival! We love him already.
xoxo, MJ
Munchkin rids the world of the mundane by developing clever, innovative solutions that make family life safe, easier, and more fun. You can find their products at Munchkin.com, Target, Babies’R’Us, Walmart, and Amazon. It’s the little things!